PHPKB Single Sign-On (SSO) Reference Guide
Estimated Reading Time: 8 MinutesTable of Contents
This article provides instructions for configuring Single Sign-On between your website/application authentication system and PHPKB knowledge base software.
How Single Sign-On (SSO) works in PHPKB?
PHPKB supports Single Sign-On (SSO) which will allow you to authenticate your end users using your authentication service, such as your web application’s login. Once verified, your end users can then view your knowledge base. However, if your end-users navigate directly to your knowledge base without first authenticating, they would be redirected to your login page. With SSO user just needs to log in once to your website or other application and he immediately and automatically gets authenticated to PHPKB. SSO feature makes user, who’s logged into your system, authenticated to your knowledge base. We also provide a simple PHP example that shows how SSO works.
1. Enabling Single Sign-On (SSO)
To set up the SSO, you need to configure a few settings from the Miscellaneous tab of the "Manage Settings" section in the admin panel.
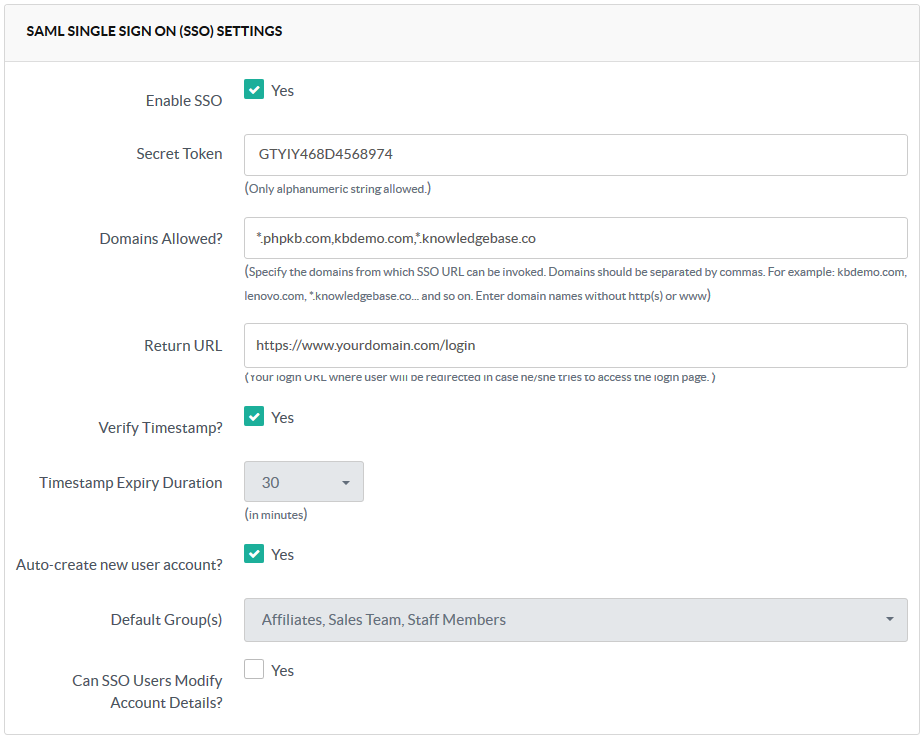
- Enable SSO : If this setting is enabled, only then users would be able to log in through a single sign-on.
- Secret Token: The secret token can be any random alphanumeric string of your choice. It is required to create the hash (explained in 4(b) below) that you need to send as a query string parameter while calling the SSO URL. It is a mandatory field and can’t be left blank.
- Domains Allowed: This is an optional security feature that you can use to restrict the SSO functionality to a few trusted domains of your choice. Leave this field blank if you don’t want to restrict the SSO functionality to any particular domain(s). You can specify * wildcard before the domain name to parse all the subdomains of the domain.
- Return URL: If you wish to restrict access to the knowledge base only through the Single Sign-On facility, then fill the field with the URL where the user would be redirected in case he tries to access the login page of a knowledge base. PHPKB sends two additional parameters redirecttype and redirectid with this URL in case, the user was trying to access the category and article page.
https://yourdomain.com/login?redirecttype=article&redirectid=31You can capture these variables and send them to SSO script to redirect the user to a location, he was trying to access. - Verify Timestamp: Enable this setting to define the time limit for which the hash would be valid.
- Timestamp Expiry Duration: Select the minutes for which the sent query parameter and hash token would be valid. This parameter is quite useful to synchronize your site logins with a knowledge base access.
- Auto-create new user account: When the login mode is passed to the SSO call, PHPKB software will search the username passed in the knowledge base database. If this setting is enabled, and system doesn’t find the passed username in a knowledge base, it will auto-create the new account with parameters passed in a query string. Otherwise, system will redirect the user to access denied page. In case this setting is disabled then it becomes your responsibility to synchronize databases of your site and knowledge base.
- Default Groups(s): You can also specify the default group(s) (required for access to private contents) that should be assigned to a user while account creation.
- Can SSO Users Modify Account Details: Enable this setting if you want that users created through SSO can change their email and password details in the knowledge base. By default, this setting is disabled.
2. Connecting to SSO
After setting up the SSO in the knowledge base settings, the next task is to call the SSO URL in your script. SSO can be accessed at
<path to your kb> /sso.php
http://www.yourdomain.com/phpkb/sso.php?mode=login&query=&hash=
In the above example URL, some parameters namely mode , query and hash are passed to the sso.php script. We will learn about these parameters and how to prepare their values in the steps below.
3. Preparing SSO Query Parameters
The next step is to prepare the query string parameters for the SSO script. The SSO script operates in two modes; login and logout . Login mode can be accessed only through GET that means query parameters should be passed as $_GET method, however, logout mode can be accessed via both GET and POST.
Query string parameter is mode and possible values for it are login and logout.
3.1 mode=login
Important: The mode=login requires two additional parameters " query " and " hash " along with the mode parameter. Details of both query and hash parameters are given below.
a) query: This parameter contains the base64 encoded value of all the important parameters that are passed to the script. There are three mandatory parameters without which script will halt; these parameters are username, name, email. Time stamp (t) is optional but also required if verify timestamp setting is enabled in SSO settings. Along with these, you can also pass groups (comma separated Group IDs) and dl (default language, only in case of multi-language edition) parameters.
You can experiment with timestamp value (PHPKB accept timestamp in seconds) with online converters:
https://www.epochconverter.com/
https://www.timestampconvert.com
username=jason&email=jason@example.com&name=Jason+Burke&t=1357604345&groups=5,6,7&dl=1
The Base64 encoded value of the above query string becomes as shown below. You can use this base64 encoder for testing.
dXNlcm5hbWU9amFzb24mZW1haWw9amFzb25AZXhhbXBsZS5jb20mbmFtZT1KYXNvbitCdXJrZSZ0PTEzNTc2MDQzNDUmZ3JvdXBzPTUsNiw3JmRsPTE=
You need to pass this base64 encoded string to the query parameter as shown below.
query=dXNlcm5hbWU9amFzb24mZW1haWw9amFzb25AZXhhbXBsZS5jb20mbmFtZT1KYXNvbitCdXJrZSZ0PTEzNTc2MDQzNDUmZ3JvdXBzPTUsNiw3JmRsPTE=
b) hash: This parameter contains the token required to check the authenticity of the data sent to SSO script. Hash is a sha256 representation of query parameter and secret token specified in the SSO settings.
sha256(base64encoded_query + secret_token)
Important: The plus (+) symbol shown above is only used to represent concatenation of Base64 Encoded Query String and the Secret Token. It does not mean that plus (+) symbol is to be used between both while generating SHA256 Hash. So, with the base64 value of query string mentioned above and the secret token used in our SSO settings (in the screenshot above), the concatenated string becomes:
dXNlcm5hbWU9amFzb24mZW1haWw9amFzb25AZXhhbXBsZS5jb20mbmFtZT1KYXNvbitCdXJrZSZ0PTEzNTc2MDQzNDUmZ3JvdXBzPTUsNiw3JmRsPTE=GTYIY468D4568974
where GTYIY468D4568974 is the value of secret token.
You can use this SHA256 hash generator for testing.
So, the SHA256 value is passed to the "hash" parameter as shown below.
hash=654C7D200A0E7A804C8053633CBEF8C0D30D9EA4991DA6C274958CD5DE1D34A4
The complete SSO URL with parameters that you can link from your site would look like:
http://www.yourdomain.com/phpkb/sso.php?mode=login&query=dXNlcm5hbWU9amFzb24mZW1haWw9amFzb25AZXhhbXBsZS5jb20mbmFtZT1KYXNvbitCdXJrZSZ0PTEzNTc2MDQzNDUmZ3JvdXBzPTUsNiw3JmRsPTE=&hash=654C7D200A0E7A804C8053633CBEF8C0D30D9EA4991DA6C274958CD5DE1D34A4
c) redirecttype: When a non-logged in user tries to access the article or category page, the SSO script redirects him to URL specified in ’Return URL’ setting along with this parameter which can have any of the two values article or category. After a user logs in to your portal, you can send this parameter back to SSO script to transfer the user to the page which he/she was trying to access.
redirecttype=category
d) redirectid: This parameter defines the ID of the article/category depending upon the value of the redirecttype parameter. You should send this parameter along with redirecttype parameter to send the user to a precise location.
redirectid=1
Now, the complete URL will look like:
http://www.yourdomain.com/phpkb/sso.php?mode=login&query=dXNlcm5hbWU9amFzb24mZW1haWw9amFzb25AZXhhbXBsZS5jb20mbmFtZT1KYXNvbitCdXJrZSZ0PTEzNTc2MDQzNDUmZ3JvdXBzPTUsNiw3JmRsPTE=&hash=654C7D200A0E7A804C8053633CBEF8C0D30D9EA4991DA6C274958CD5DE1D34A4&redirecttype=category&redirectid=1
3.2 mode=logout
The Logout mode can be called in both ways either through POST or GET. When a user logs out from your site/application, you can either make a call to the SSO script with mode=logout
Example: http://www.yourdomain.com/phpkb/sso.php?mode=logout
or can call the above URL through your script with POST call. POST call would return the success status code 200 in JSON format. You can use it to confirm a successful logout of user from the knowledge base.
Error Codes
| Code | Description |
| 400E1 | Missing required URL parameter. |
| 400E2 | Invalid URL parameter received. |
| 400E3 | Timestamp parameter too old. |
| 400E4 | User account can not be created because duplicate usernames are not allowed. |
| 401E1 | Authentication failed; could not authenticate user because of invalid hash. |
| 401E2 | Could not authenticate request because of invalid domain referrer. |
| 404E1 | The requested user account is inactive. |
| 404E2 | The requested user account not found in database. |
| 500E1 | Database Error. |
| 503E1 | SSO is not available. SSO is currently disabled. |
Example SSO Video
Check out this video made by our client and see how easy it is with Single Sign-On to show your logged-in users the private content in the knowledge base without requiring any additional login in the knowledge base site.